QuickHonda's Garage - Valve Adjustment
Refer to dlustrations 20.5 and 20.6
1 The valve clearances are checked and adjusted with the engine cold.
2 On carbureted models, remove the air cleaner assembly.
3 Remove the camshaft cover.
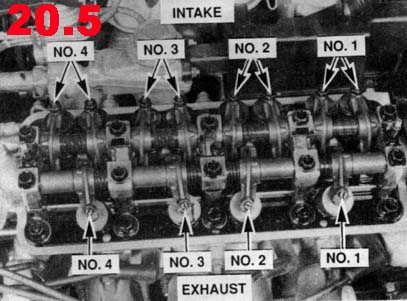
4 Position the number one piston at Top Dead Center. (the one closest to the drivebelt end
of the engine)
5 With the engine in this position, the number one cylinder valve adjustment can be
checked and adjusted (see illustration).
6 Start with the intake valve clearance. Note: Most models have two intake valves per
cylinder(12-valve and 16-valve engines); on these models, the adjustment procedure and
tolearance are the same for both valves. Insert a feeler gauge of the thickness listed on
the specifications page between the intake valve stem and the adjusting screw. Withdraw
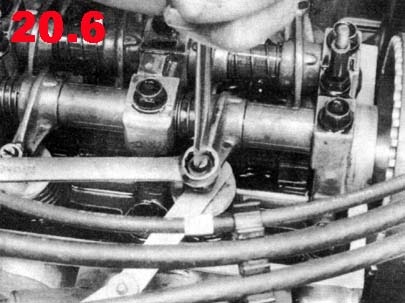
it; you should feel a slight drag. If there's no drag or a heavy drag, loosen the ad
juster nut and back off the adjuster screw (see illustration). Carefully tighten the
adjuster screw until you can feel a slight drag on the feeler gauge as you withdraw it.
7 Hold the adjuster screw with a screwdriver (to keep it from turning) and tighten the
locknut. Recheck the clearance to make sure it hasn't changed.
8 Adjust the number one exhaust valve using the same procedure you used for the intake
valve(s). Note: 16-valve engines have two exhaust valves per cylinder. On these models,
the adjustment procedure and clearance are the same for both valves. Be sure to use a
feeler gauge of the specified thickness. If your vehicle is equipped with auxiliary valves
(smaller valves, adjacent to the exhaust valves), also adjust the number one auxiliary
valve using the same procedure. Note that the auxiliary valves have a different clearance
than exhaust valves.
9 Position the number three piston at TDC. Check and adjust the number three cylinder
valve clearances.
10 Position the number four piston at TDC. Check and adjust the number four cylinder valves.
11 Position the number two piston at TDC. Check and adjust the number two cylinder valves.
12 Install the camshaft cover and the air cleaner assembly.
this page created a very long time ago